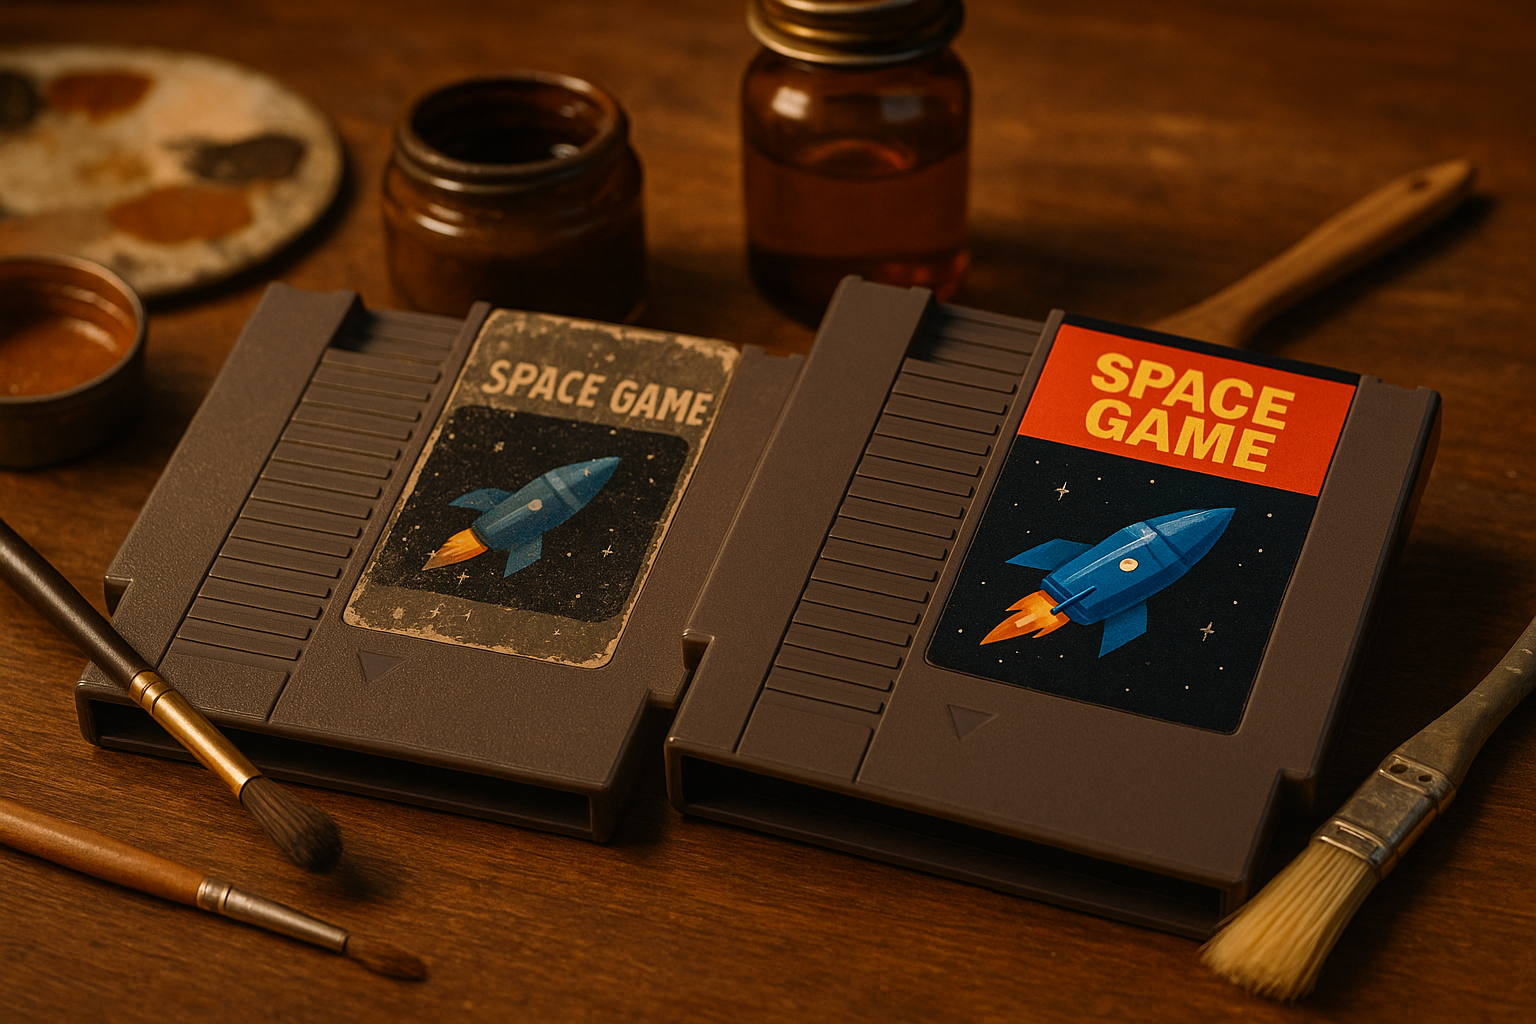
In the hallowed annals of video gaming history, the significance of the cartridge-based systems is nothing short of profound. The bold, vibrant labels adorning these cartridges represent an iconic era of gaming, filled with a rich tapestry of stories, adventures, and experiences that have forever etched themselves into the memories of many. But, alas, the unforgiving hands of time and the relentless wear and tear inevitably take their toll, leaving behind faded, torn, and worn-out labels that are but a mere shadow of their former glory. This article, “Revive Your Retro: The Ultimate Guide to Restoring Torn or Faded Cartridge Labels for a Like-New Gaming Experience”, seeks to guide you through the journey of restoring these cherished mementos back to their prime.
Before delving into the depths of restoration, let’s pause to appreciate the gravity of our mission. For many, these cartridges are more than just games; they are priceless relics that encapsulate a bygone era. Restoring these labels is not just about aesthetic appeal; it is about preserving a piece of history, a piece of our childhood, and perhaps, for some, even a piece of our identity. The process may seem daunting, but fear not, for this guide is designed to provide a comprehensive, step-by-step approach to help both the novice and the seasoned enthusiast navigate through this restoration journey.
Our expedition will unfold across several key areas. We will commence with an exploration into the tools and materials required for the restoration process, offering valuable insights into their selection and use. This will be followed by a detailed tutorial on how to remove the old labels without causing further damage to the cartridges. Next, we will venture into the realm of label design and printing, sharing insider tips on how to recreate or restore the original designs with remarkable fidelity. Finally, we will guide you through the process of label application, ensuring a smooth, flawless finish that would make any retro gaming enthusiast beam with pride. Buckle up, fellow gamers, for a rewarding journey into the heart of cartridge label restoration awaits us!
Understanding Cartridge Label Damage
One of the most common and unfortunate issues that retro gamers face is the wear and tear on their game cartridge labels. From fading colors to ripped corners, these damages not only affect the aesthetic value of the game, but can also significantly reduce its resale value. Even more heartbreakingly, it may take away from the nostalgic feeling that comes from holding a piece of gaming history. But why does this damage happen in the first place? There are several reasons why game cartridge labels deteriorate over time. One of the primary culprits is exposure to sunlight. Ultraviolet (UV) rays can fade the vibrant colors of the label, leaving it dull and lackluster. Another common cause is moisture. Whether it’s due to spills, high humidity, or poor storage conditions, moisture can cause the label to peel or warp. Physical handling is another major factor. Over time, repeated use, especially if the game cartridge is not handled carefully, can lead to scratches and tears. But whatever the cause of the damage, all is not lost. With a little time, patience, and the right techniques, you can restore your game cartridge labels to their former glory. In this comprehensive guide, I will take you through the process step-by-step, providing tips and tricks to achieve the best results.Identifying the Type and Extent of Damage
Before you can begin restoring your game cartridge labels, you need to identify the type and extent of the damage. This will help you determine the best approach to take. Common types of damage include fading, peeling, tearing, scratching, and staining. Each of these requires a different restoration technique, so it’s essential to assess the damage accurately. To help you in this task, I’ve created a table that outlines the different types of damage and their corresponding restoration techniques. Refer to this table to identify the best approach for your specific situation.| Type of Damage | Restoration Technique |
|---|---|
| Fading | Color restoration |
| Peeling | Adhesive repair |
| Tearing | Paper repair |
| Scratching | Surface smoothing |
| Staining | Stain removal |
Once you have identified the type and extent of the damage, you’re ready to start the restoration process. Remember, patience and meticulousness are key to achieving the best results. Now, let’s dive into the specific techniques for each type of damage.
Fading: Color Restoration
One of the most common types of damage to game cartridge labels is fading. This often results from prolonged exposure to sunlight. The good news is, it’s possible to restore faded colors using color restoration techniques. Here’s how:- First, you’ll need to clean the label to remove any dust or dirt. Use a soft, dry cloth for this. Avoid using water or any other liquid as it may further damage the label.
- Next, use a color restoration software. There are several good options available, including Photoshop and GIMP. Scan the label into your computer, then use the software to enhance the colors. This step requires a bit of skill, but there are plenty of online tutorials to help you. One that I highly recommend is “How to Restore Faded Colors in Photoshop” by Photoshop Training Channel.
- Once you’ve enhanced the colors, print the restored image on a high-quality adhesive paper. Make sure to use a printer that can handle high-resolution images to get the best results.
- Finally, carefully apply the new label onto the game cartridge. Make sure to align it perfectly to avoid any wrinkles or bubbles.
This process may seem a bit daunting, especially if you’re not familiar with image editing software. But don’t worry, with a bit of practice, you’ll get the hang of it. And the results will be well worth the effort.
Peeling: Adhesive Repair
If your game cartridge label is peeling at the corners or sides, don’t worry. This is a common problem, especially for older cartridges, and it can be fixed with a little bit of adhesive.- Start by cleaning the area where the label is peeling. Use a soft cloth and a small amount of isopropyl alcohol. Be careful not to get any alcohol on the label itself, as it may cause further damage.
- Next, apply a thin layer of adhesive to the back of the peeling label. I recommend using a glue stick as it’s easy to control and won’t seep through the label. Make sure to apply the adhesive evenly and avoid any lumps or bubbles.
- Once the adhesive is applied, carefully press the label back onto the cartridge. Use a soft cloth or a roller to smooth out any wrinkles or bubbles. Make sure to apply even pressure to ensure a good bond.
While adhesive repair can fix peeling labels, it’s important to note that it’s a temporary solution. Over time, the adhesive may dry out and the label may start to peel again. Therefore, it’s crucial to store your game cartridges in a cool, dry place to prolong the life of the adhesive.
Tearing: Paper Repair
Tears in game cartridge labels can be heartbreaking for any retro gamer. But don’t despair, with a bit of careful repair work, you can restore your beloved games to their former glory.- Start by cleaning the area around the tear. Use a soft cloth and a small amount of isopropyl alcohol. As before, be careful not to get any alcohol on the label itself.
- Next, apply a thin layer of adhesive to one side of the tear. Again, a glue stick is your best bet here. Make sure to cover the entire tear, but avoid using too much adhesive as it may seep through the label and create a stain.
- Once the adhesive is applied, carefully align the two sides of the tear and press them together. Use a soft cloth or a roller to ensure a smooth and even bond. Make sure to wipe away any excess adhesive immediately to avoid staining.
Repairing a tear in a game cartridge label can be a bit tricky, especially if the tear is large or in a conspicuous place. But with patience and careful handling, it’s definitely doable. And the satisfaction of seeing your restored game cartridge is well worth the effort.
Scratching: Surface Smoothing
Scratches on game cartridge labels are another common issue. While minor scratches can be ignored, deep scratches can ruin the appearance of the label and make the text or artwork difficult to see. But don’t worry, with a bit of careful smoothing, you can make those scratches less noticeable.- First, clean the scratched area with a soft cloth and a small amount of isopropyl alcohol. Be gentle to avoid causing further damage.
- Next, apply a thin layer of clear nail polish over the scratch. The nail polish will fill in the scratch and create a smooth surface. Make sure to apply it evenly and avoid any lumps or bubbles.
- Let the nail polish dry completely before handling the game cartridge. This may take several hours or even overnight, so be patient.
Please note that this method is only suitable for minor to moderate scratches. Deep scratches or gouges may require a more complex restoration process. However, for most scratches, this simple method can make a noticeable difference.
Staining: Stain Removal
Stains on game cartridge labels can be quite stubborn, but don’t lose hope. With the right techniques, you can remove or at least reduce the visibility of most stains.- Start by identifying the type of stain. Organic stains (like food or drink) can often be removed with a mild soap and water solution, while inorganic stains (like ink or paint) may require a specialized stain remover.
- Next, apply the appropriate cleaning solution to a soft cloth. Never apply the solution directly to the label, as it may cause further damage.
- Gently dab the stain with the cloth. Avoid rubbing or scrubbing as it may spread the stain or cause further damage to the label.
- Once the stain is removed, blot the area dry with a clean cloth. Avoid rubbing or scrubbing as it may cause the label to peel or warp.
Remember, stain removal is a delicate process and requires a lot of patience. Don’t rush it and don’t get discouraged if the stain doesn’t disappear completely. Sometimes, reducing the visibility of the stain is the best you can do. But even a small improvement can make a big difference in the overall appearance of the game cartridge.
Final Thoughts
ConclusionHaving delved into the deep waters of restoring cartridge labels, we can confidently conclude that there is indeed hope for retro gamers facing the disheartening effects of label wear and tear. From the factors causing label damage, to the techniques for repairing and restoring, this comprehensive guide has covered an array of solutions to help salvage your beloved games and, in turn, retain their aesthetic and resale value. We started our journey by examining the reasons behind cartridge label damage – exposure to sunlight, moisture, and physical handling. We’ve learned that understanding the nature and extent of damage is a critical first step to restoration, with common types of damage including fading, peeling, tearing, scratching, and staining. This knowledge then leads us to select the most suitable restoration technique for each specific type of damage. The restoration techniques we’ve explored include color restoration, adhesive repair, paper repair, surface smoothing, and stain removal. Through this guide, we have found that each technique involves meticulous steps, from cleaning the label to applying the appropriate restoration solution. This process may require patience, precision, and a bit of practice, but the outcome is undeniably rewarding. Color restoration is a practical solution for faded labels, using software like Photoshop and GIMP to enhance the label’s colors, while adhesive repair can fix peeling labels, albeit temporarily. Paper repair can mend heartbreaking tears on labels, while surface smoothing can make scratches less noticeable. For stubborn stains, the stain removal technique can be a game-changer. Each of these restoration techniques contributes to reviving the original charm and aesthetics of the retro games, proving that a little bit of effort and care can go a long way. Given the detailed nature of the techniques provided, it is clear that restoring cartridge labels is not just a process, but a labor of love for the passionate retro gamer. And although each restoration technique presents its challenges, they all are well within the reach of anyone willing to put in the time and effort. But let’s not forget, the importance of proper storage and careful handling of the game cartridges cannot be overstated. Protecting the cartridges from the detrimental effects of sunlight, moisture, and rough handling can help prevent label damage in the first place, ultimately saving you from the need for restoration down the line. In the end, the journey of restoring cartridge labels is one filled with nostalgia, love for gaming, and the joy of seeing the games restored to their former glory. It’s about holding onto the memories that these games represent and preserving them for future generations of gamers to enjoy. So now, it’s time to roll up your sleeves, gather your restoration tools, and embark on this rewarding journey of cartridge label restoration. Don’t forget to share your experiences and results with other retro gamers in the community. Let your work inspire others to bring life back to their retro gaming collections. Happy gaming and restoring! Feel free to comment below and share your thoughts, experiences, or questions about game cartridge label restoration. We’d love to hear from you. And if you found this guide helpful, please consider sharing it with other retro gamers. For more in-depth tutorials on restoration techniques, consider checking out the “How to Restore Faded Colors in Photoshop” by Photoshop Training Channel. Stay tuned for more guides on maintaining and restoring retro games, and remember – while the journey may be challenging, the destination is definitely worth it. 🎮